Accessibility for all
Technology has permeated almost every aspect of our lives. Access to that technology and being able to use it enables us, especially those of us with additional needs, to participate in society to a greater extent. Over the past decade an enormous effort has gone into providing built-in accessibility features in many of the devices, applications and operating systems we use every day.
While there are far too many features to cover in just one article, I have highlighted some of the accessibility features that you may find useful.
Microsoft 365
Microsoft underwent a dramatic shift when Satya Nadella became CEO in 2014, placing accessibility on the top of Microsoft’s agenda. There are now many built-in accessibility features across their suite of products. Two features worth noting within Microsoft 365 (previously called Office 365) are Dictation and Immersive Reader.
Dictation
Dictation is available in all versions (web, desktop and mobile) of the Microsoft 365 edition of Word. To access Dictation in the web (online) version of Microsoft Word, log into your Microsoft 365 account, and open a new Word Document. Select “Home” then the “Dictate” icon.
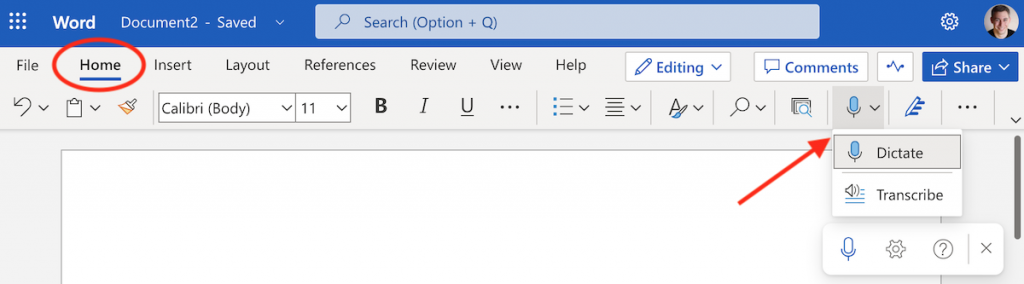
Note: Depending on which web browser you are using, and the security settings you may need to enable access to the microphone for this to work.
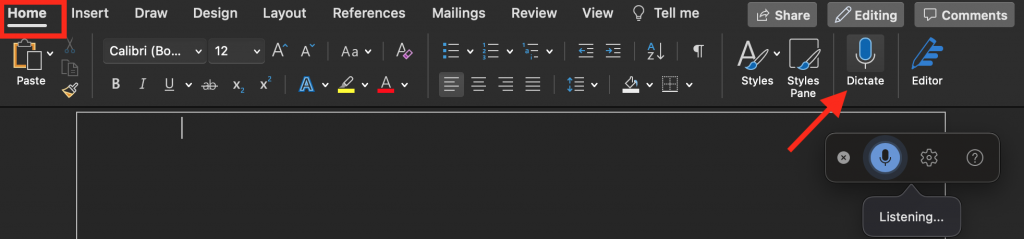
Dictate works on the desktop version too. Simply, launch Microsoft Word, open a Document, click on “Home” and then the “Dictate” icon.
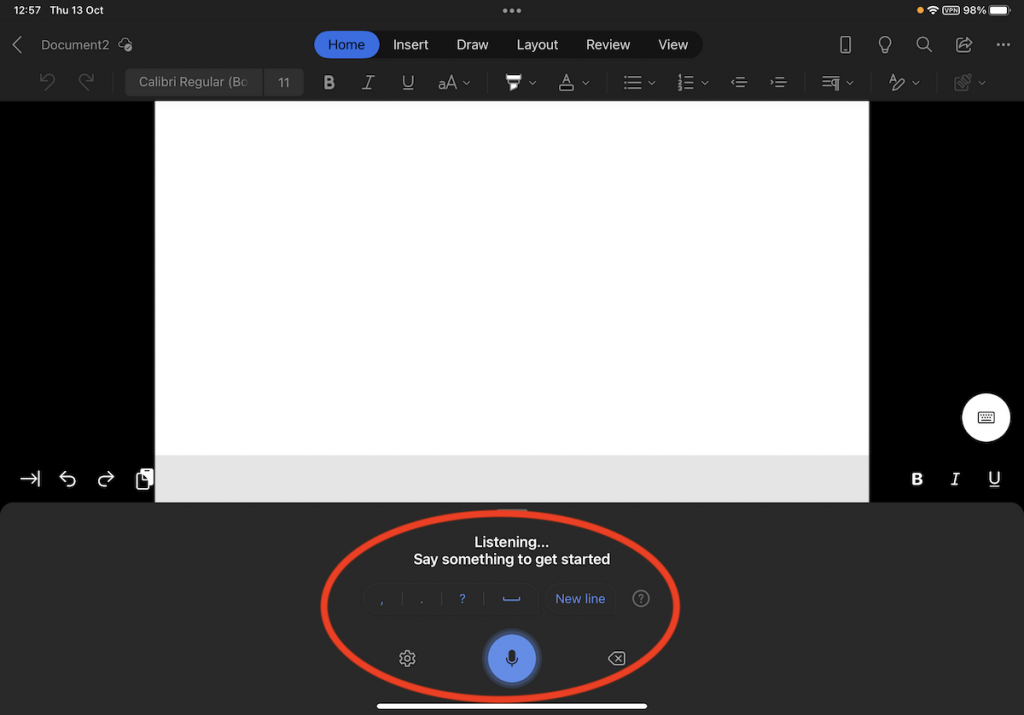
Dictate is also available on mobile devices. Tap on the Microsoft Word app, open a Document and you will notice a microphone icon in the bottom right of the screen, just above the keyboard. Tapping on the icon starts dictation.
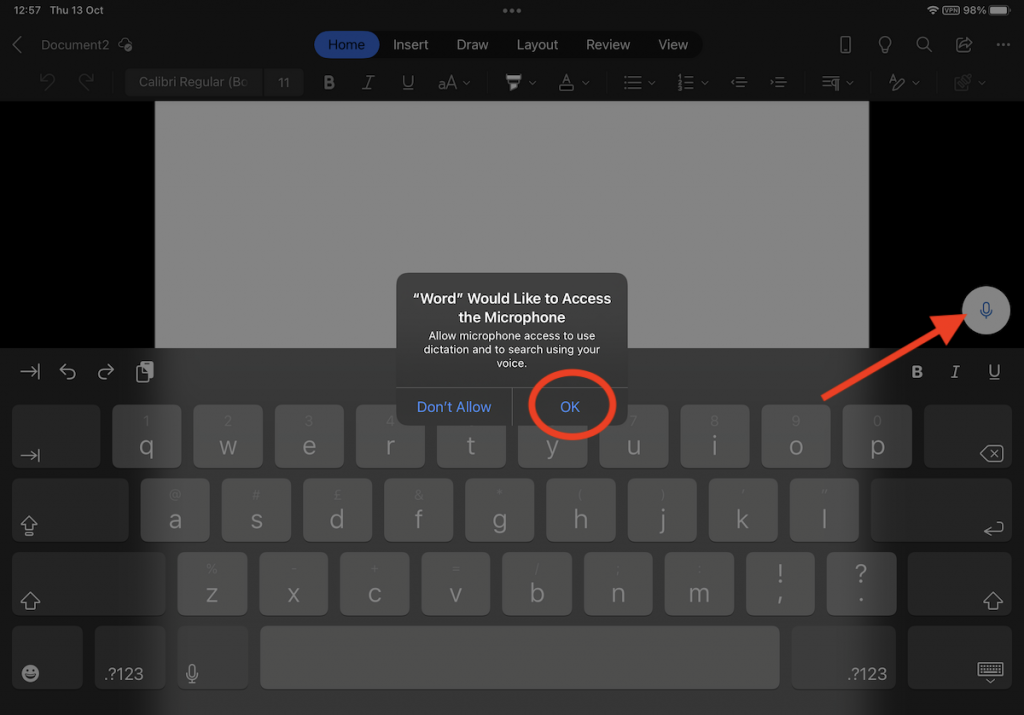
Note: There can sometimes be a short delay before the microphone becomes active. You may also need to grant access to the microphone.
You can now speak what you want to have typed into the document.
As with all speech-to-text systems, it isn’t 100% accurate. However, it does provide a great way to create a text document with minimal keyboard input. For a full list of Dictation’s features and how to use it, please see the Microsoft Dictation help pages:
Tip: Wanting to transcribe a conversation or interview, check out Transcribe also found under the dictation menu.

See Microsoft’s Transcribe help page for more information.
Immersive Reader
Microsoft’s Immersive Reader is a real gem. If you are not aware of it, urge you to have a look at it. In keeping with Microsoft’s “on every device” principle Immersive reader is available on web, iPad and desktop. However, there are some small differences between the exact features available depending on the platform.
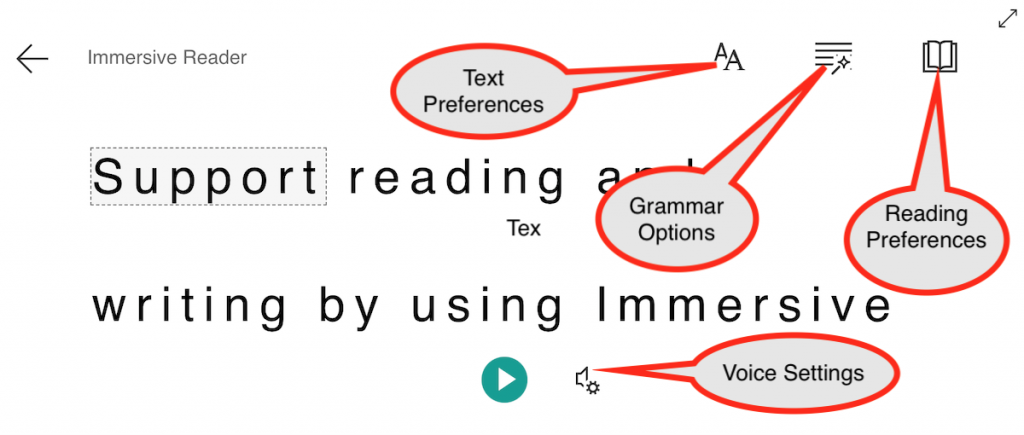
Immersive Reader allows you to make adjustments to the text to best support your needs. These include adjusting the size and spacing of the font, breaking words up into syl·la·bles, highlighting parts of speech, changing the background colour, speaking the text and more. Of particular note is Boardmaker PCS symbol support – unfortunately, this is only available on the web version.

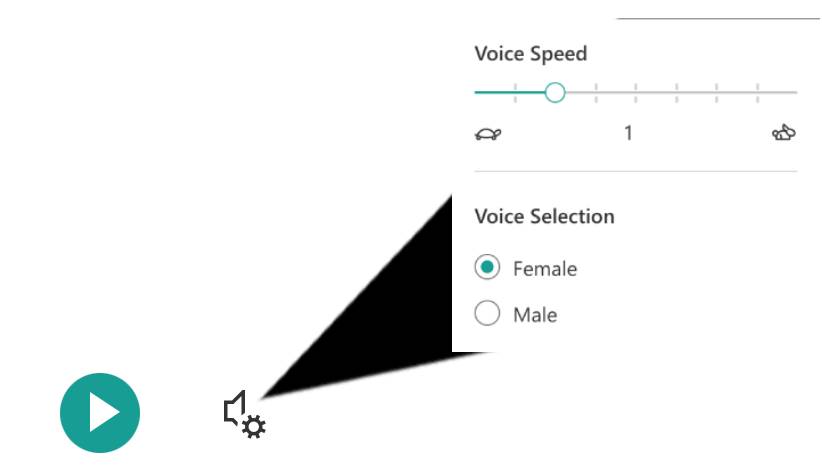
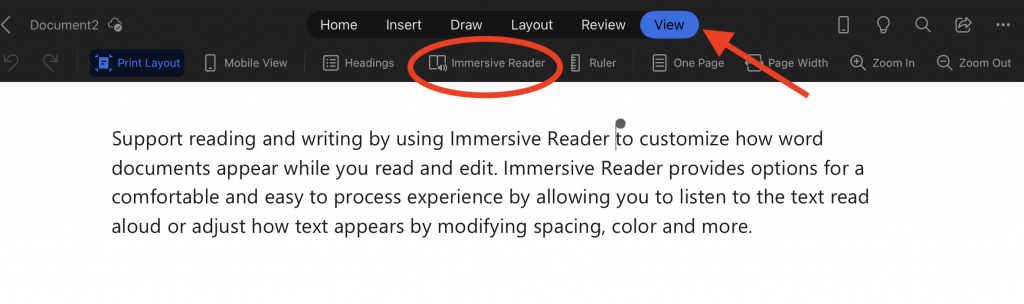
To access Immersive Reader on the web, open a web browser, login to Microsoft 365 and launch Microsoft Word. Click “View” then “Immersive Reader”. This will open the document Immersive Reader view. This view can also be expanded to full screen. The display preferences can be set by clicking on the three icons located in the top right corner of the screen. The text can be spoken by clicking on the “Play” icon on the bottom middle of the screen. Clicking the gears icon next to the play button allows you to adjust the speed and voice used to read the text out loud.
To access Immersive Reader on an iPad, tap on the Microsoft Word app, tap “View” then tap “Immersive Reader”
To access Immersive Reader on a desktop, launch the Microsoft Word application click on “View” then “Immersive Reader”.

For more information please visit the Microsoft Immersive Reader help page.
iOS and iPadOS
In the interest of brevity, I will use “iOS” referring to both iOS and iPadOS.
Display & Text Size
Sometimes, you just need to adjust the size of things. Tapping on “Settings”, then Accessibility, then with in the vision group, tap “Display & Text Size”. From within the Display & Text Size settings you can choose to bold text, increase text size, adjust button shapes, turn labels on or off, and reduce transparency. You can also increase the contrast, differentiate without colour, invert display colours and add colour filters.

Zoom
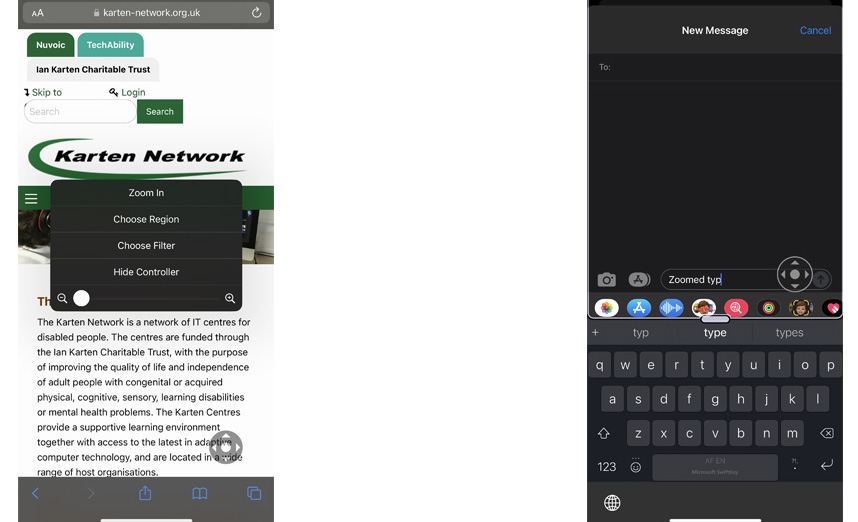
If you find you have a need to enlarge things on the screen, then enabling the Zoom feature may be useful. To do this, tap on “Settings”, then Accessibility, then with in the vision group, tap “Zoom”, and tap to turn it on. Once enabled, double-tapping with three fingers anywhere on the screen will open the magnifier (Zoom). Depending on your version of iOS you will either get a menu with options, or a magnifier window.
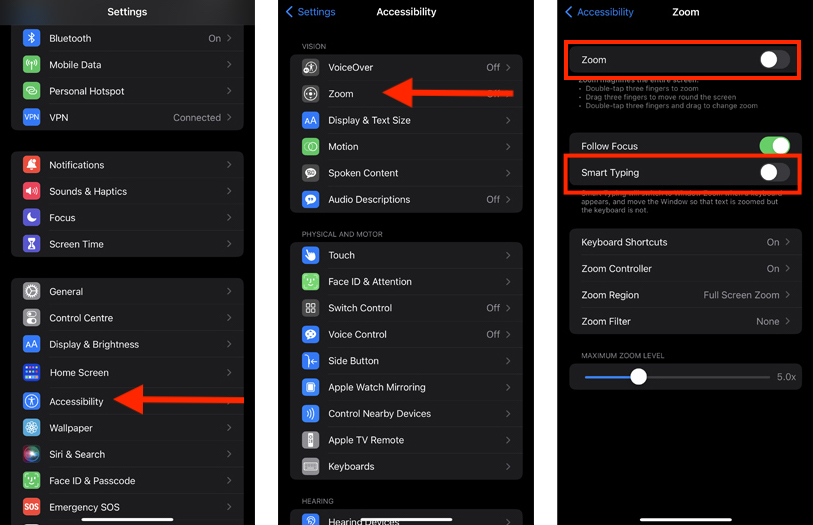
If you find Zoom useful, then I suggest also turning on the Smart Typing Function – also found within the Zoom options under Accessibility. This feature automatically magnifies any text you type in an input field, e.g. when you write a message.
Magnifier
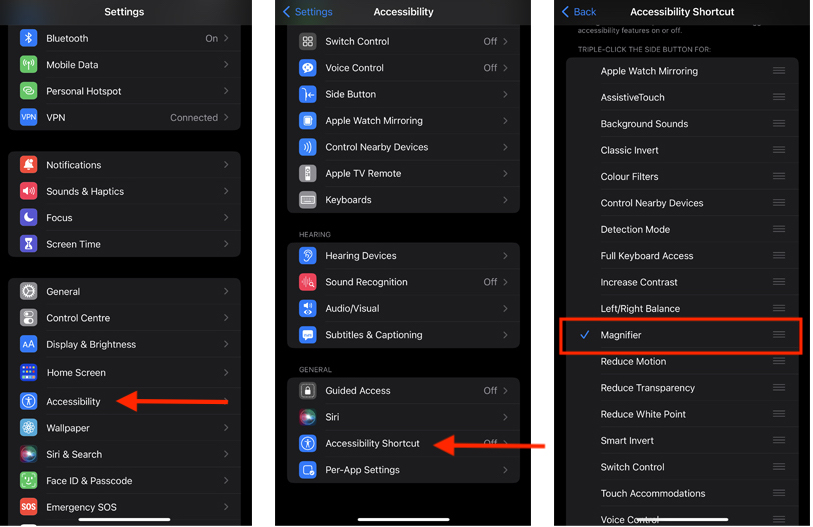
Depending on your version of iOS and device the built-in magnifier app can be a powerful tool to view and identify objects in your environment. If you can’t find the magnifier app either search for it using the spotlight search or in the App Library. Alternatively, you can enable an accessibility shortcut. To do this, tap on “Settings”, then “Accessibility”, then with in the general group, and tap “Accessibility Shortcut”, scroll to “Magnifier” and tap on it – a check (tick) will appear next to it. Now triple clicking the Side button or Home button will open the Magnifier app.
Within the Magnifier app there are a number of settings and features, including filters, torch and detection. Detection can identify objects, people and doors – providing visual, audible and spoken feedback about the object, and in the case of doors and people, how far away they are.
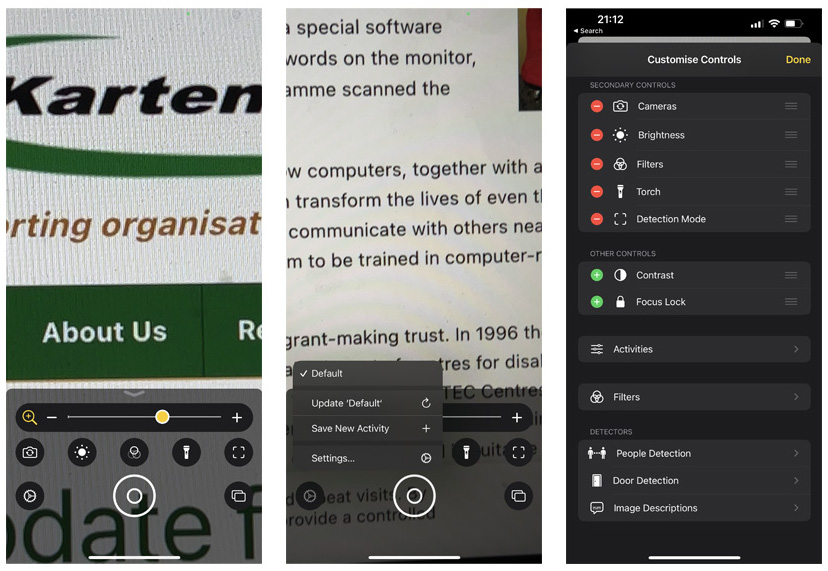
The detection feature as mentioned in the previous newsletter is only supported on the newer Apple devices with the LiDAR Scanner. While it may not be as good as dedicated assitive devices (e.g. OrCam) and other apps (e.g. Seeing AI) from my experimenting with it I found it to do a decent job.
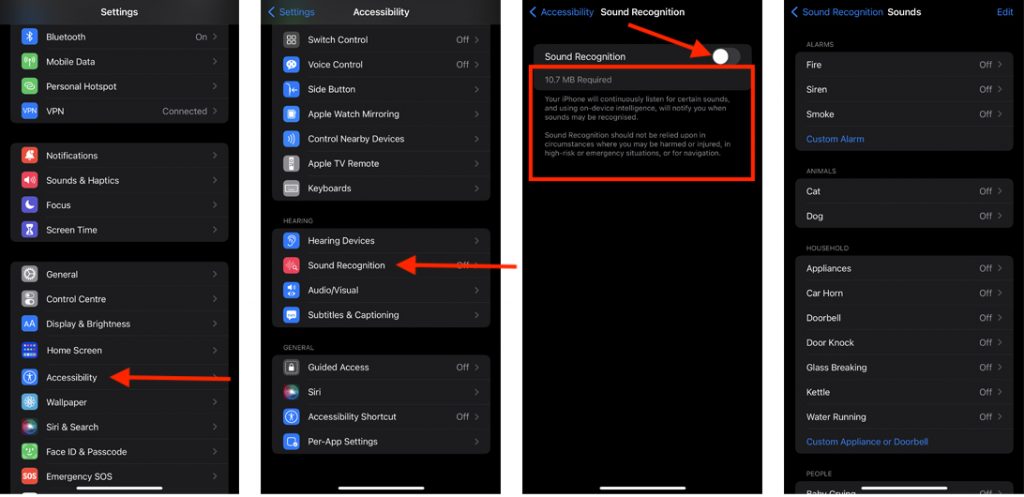
Sound Recognition
Apple devices have fairly decent microphones, these can be used to help alert you to specific sounds such as a doorbell, kettle boiling, running water etc. With the option to add custom sounds too. To enable this feature, tap on “Settings”, then Accessibility, then with in the hearing group, tap “Sound Recognition”, and tap to turn it on. If this feature has not been turned on your device, it will download some additional files before enabling it.
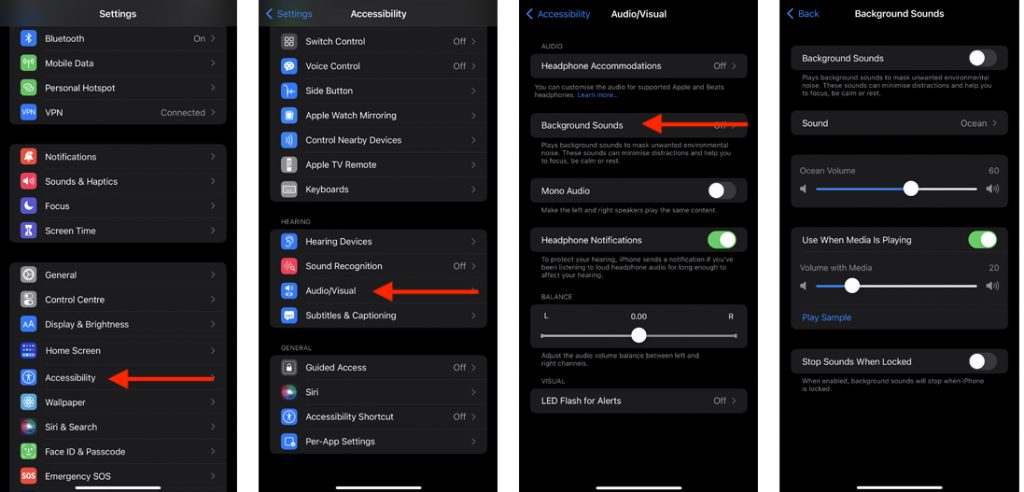
Background Sounds
Background sounds is one of those lesser-known features that can be very useful. This feature is designed to play a sound to blockout sounds within your environment, helping you to focus. To enable this feature, tap on “Settings”, then “Accessibility”, then with in the hearing group, tap “Audio/Visual”, and tap ‘Background Sounds” to turn it on. There are currently six sounds to choose from.
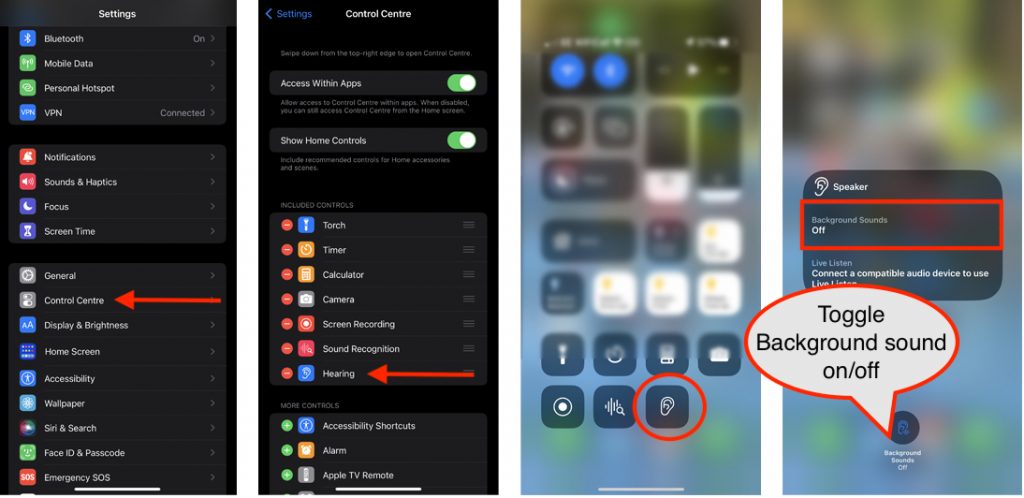
If you do find this useful, I suggest adding “Hearing” to the Control Centre. This can be done by tapping on “Settings”, then scrolling down to “Control Centre” and adding it.
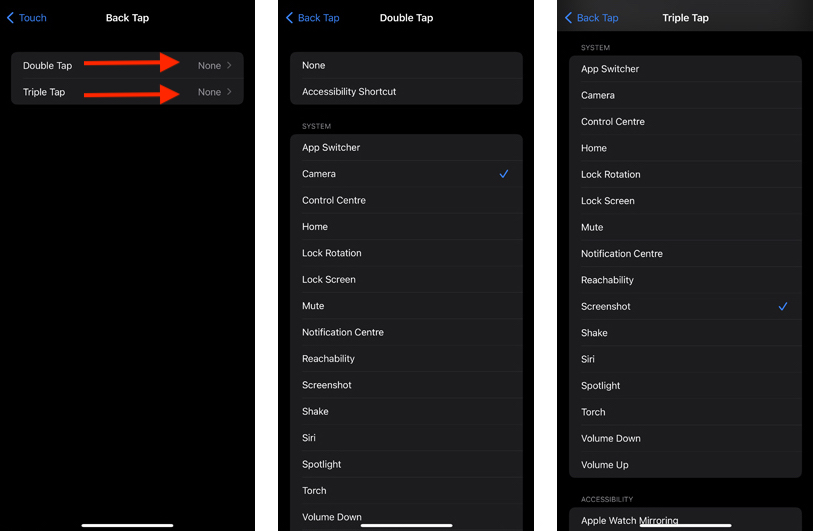
Back Tap
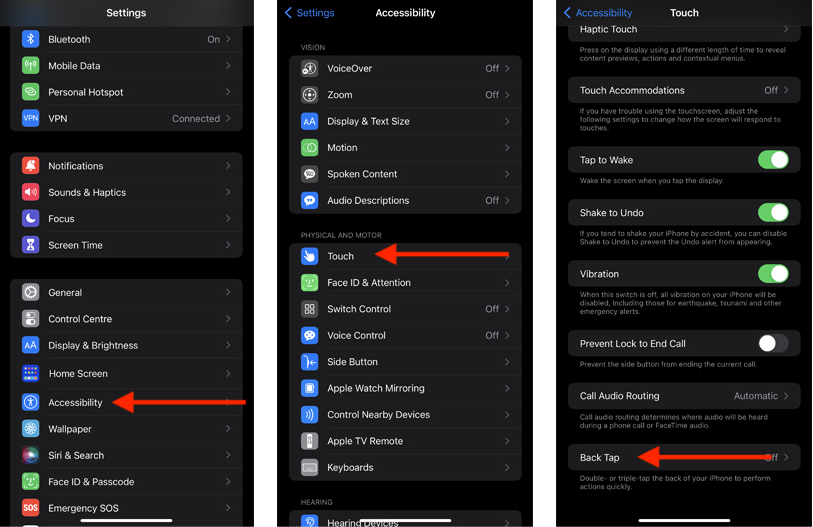
Back Tap is one of those features that has a multitude of possible uses. In short, Back Tap allows you to assign a particular function to either double or triple tapping on the back of your iPhone (not available in iPad) to trigger an action, e.g. launch the camera, take a screenshot, turn on the torch etc. Combining this with Apple Shortcuts makes even more complex actions possible.
To enable this feature tap on “Settings”, then “Accessibility”, then with in the physical and motion group, tap “touch”, scroll down to the bottom and tap ‘Back Tap” to turn it on. You can now assign an action to a double and/or triple tap.
Note: if you have a case on your iPhone this may affect the responsiveness of this feature. Although, personally even with a rugged case, I have not experienced any problems with this.
Guided Access
Guided Access restricts the use of an iPhone/iPad to a single app. You can also opt to disable the buttons on the device. This feature can be useful if you want to ensure that someone either accidently or intentionally doesn’t navigate away from a particular app.
To activate Guided Access tap on “Settings”, then “Accessibility”, then with in the general group, and tap “Guided Access” to turn it on.
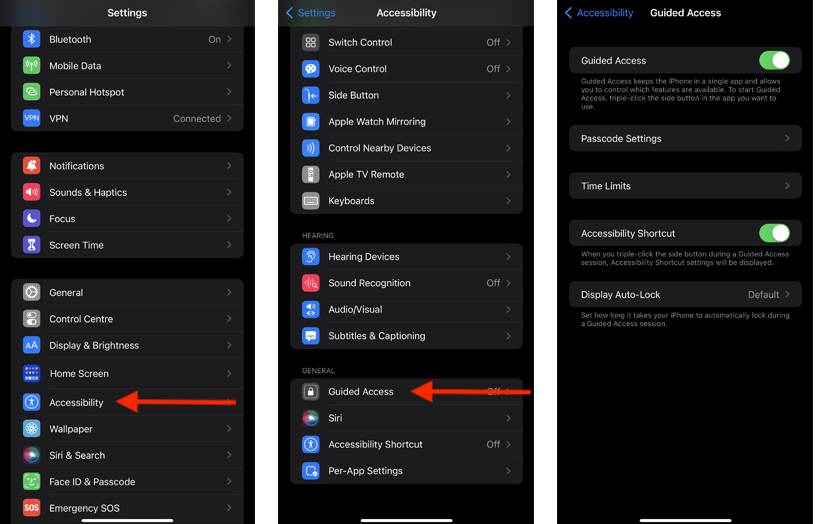
From within the Guided access settings you can set a passcode, what happens if a time limit is set, and set how long before the device locks, including preventing the device from locking. You can also turn on an Accessibility shortcut – if you are going to use Guided Access I recommend turning this on. When enabled you can triple click the side button to launch Guided Access.
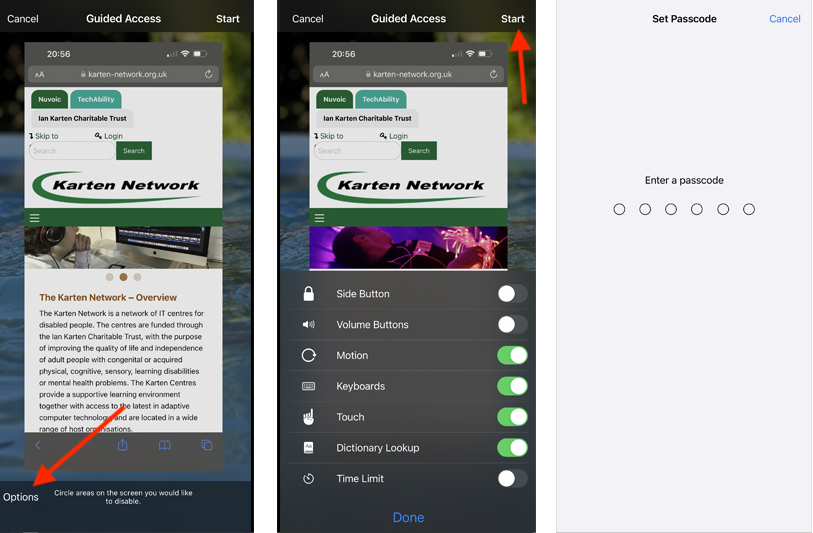
To use Guided Access, navigate to and launch the app you want to restrict use to. Start Guided Access. Triple click the side button if you enabled the shortcut. You now have the option to set more specific restrictions e.g. disabling the volume buttons. Then tap “Start”. You will be prompted to enter a passcode. This passcode is unique to Guided Access and can be different to the passcode used to unlock the device. Use of the device is now restricted to the chosen app.
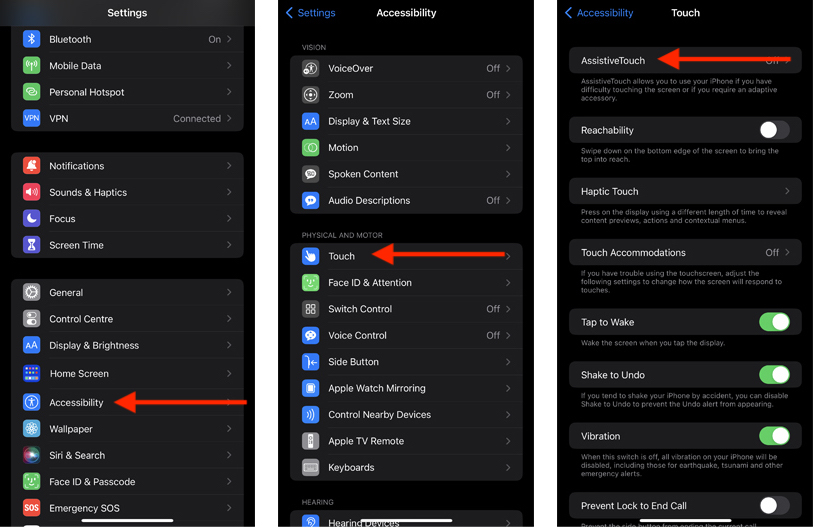
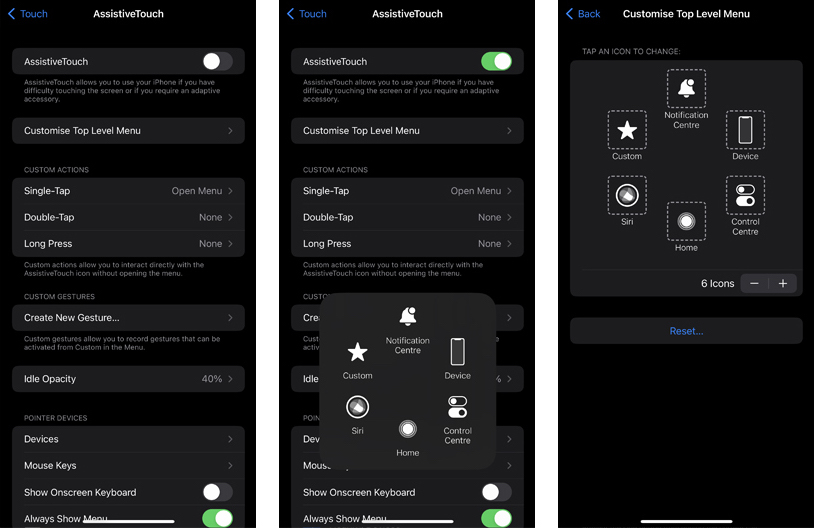
Assistive Touch
Assistive Touch is designed to help with people who either have difficulty using the touch screen (or part thereof) or require an adaptive accessory. To enable this feature tap on “Settings”, then “Accessibility”, then with in the physical and motion group, tap “Touch”, and tap “Assistive Touch” to turn it on.
Once enabled a floating virtual button will appear on the screen. Selecting it will open a menu with a multitude of options, from controlling the device to viewing notifications and the options can be customized to suit your needs.
Spoken Content
Personally, Spoken Content is one of my favourite features. While it may not have all the features of an app like Speechify it is extremely effective at reading content. To enable this feature, tap on “Settings”, then Accessibility, then with in the vision group, tap “Spoken Content”. Within the Spoken Content settings you have the options to “Speak Selection” or “Speak Screen” – unless you have a particular need for the entire screen to be spoken, I recommend only enabling “Speak Selection”.

“Typing Feedback” a subsection of the Spoken Content setting allows you to enable spoken feedback to what is being typed and speak predictions.
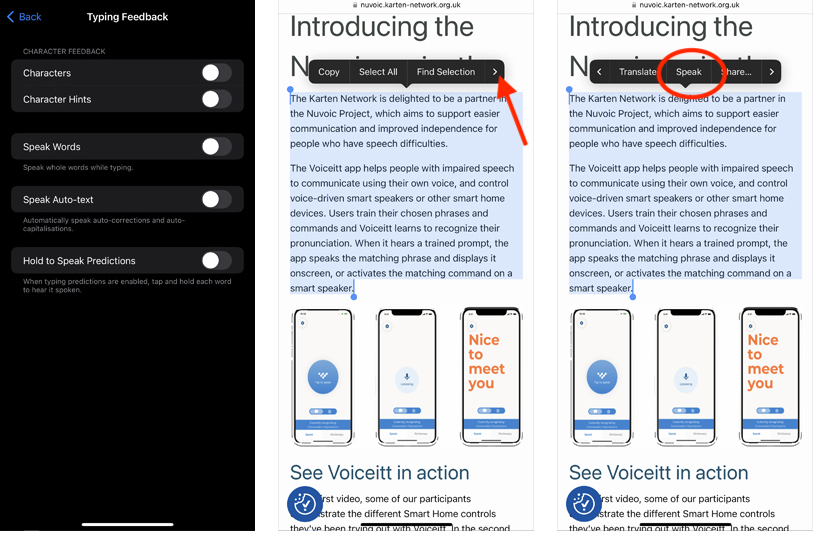
If you have Spoken Content enabled you can now select any text, and from the context menu select “Speak” to have it read to you. Note: The “Speak” option may be hidden further along the context menu – tap the right arrow to view it.
More Accessibility features
I have only scratched the surface of the accessibility features in Microsoft 365 and iOS. Not to mention the fact that many of the accessibility features are also available for Android based devices.
For more information, please visit the following web pages:
- Microsoft’s Accessibility
- Microsoft 365 Accessibility
- Apple Accessibility
- Android Accessibility
- Samsung Accessibility
Get in touch
As always, I am keen to hear about how you are using mobile and other smart technology. If you would like to have a particular topic covered in the next newsletter, please let me know. Finally, I am available to provide help, support and advice to any of the Karten Centres.
Martin Pistorius – Karten Network Technology Advisor
E-mail: martin@karten-network.org.uk
Article meta data
Clicking on any of the links in this section will take you to other articles that have been tagged in the same category.
- Featured in the Karten Autumn 2022 Newsletter
- This article is listed in the following subject areas: Technology, Update from Technology Advisor